Grow Your Own Food - How I made this DIY wicking garden bed
Are Self Watering Raised Bed Gardens the new trend in backyard landscaping?
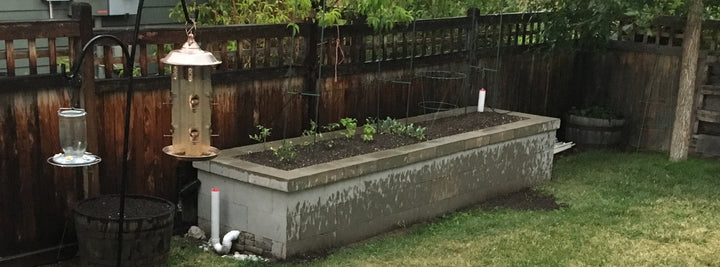
After the last month on quarantine, going to the grocery store has become a hassle where we once took it for granted. Wouldn't it be nice if you had several staples growing in your back yard? Well, last spring I decided to go all-in on a DIY wicking planter.
Backyard gardens have long been popular, but now more than ever have they become important. They can bring families, neighbors, and communities together. Crop sharing is fun with neighbors, trading fruits, and vegetables. There is science backing the health benefits of getting your hands in the dirt and eating fresh food from the garden.
Raised beds are great for planting and much easier to harvest and maintain. But watering them is always a challenge. How do you make sure each plant gets the right amount of water? Some with deep roots like tomatoes require a lot more water than something like beans or peas. And if you rotate plants each season, you have to change your watering system. That's where self-watering garden beds have the advantage.
How do self watering planters work?
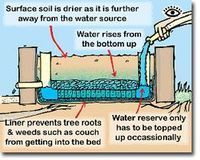
Also referred to as a SIP which stands for a sub-irrigated planter, they are a sealed container with a fill tube and a drain tube. The water sits at the base of the planter and allows the dirt to act as a wick. Much like if you dip a string into the water it will climb up the string. In the same way, the water will climb up the dirt to the roots of the plant.
Here's a quick list of what I did to create this self wicking garden bed.
- Level the site
- Fill the base layer with sand
- Level out 1 layer of bricks using a string
- Put down weed barrier and continue stacking bricks
- Insert a waterproof pond liner
- Fill with marble rocks
- Add the PVC pipe and drill drain holes in the bottom
- Top off with more rock
- Another layer of weed barrier
- Fill with water and check for leaks
- Pour concrete into the cinderblock holes
- Fill with dirt
- Plant your garden
My Wicking Beds Problems - Lessons learned and what not to do when building a self watering raised bed garden
I made the mistake of thinking it would be easy to drill a hole in a cinderblock. It is not. So I ended up removing 1 block and filling it with pavers to allow for my drain hole.
I also didn't wait long enough when testing for leaks. The drain hole was not sealed tight enough and water was leaking out of the bed. This was a major problem. I had to remove a quarter of the dirt and take apart layers of weed barrier to get to the pond liner.
Because I had filled the bricks with concrete, I couldn't fix the leak from the outside. I had to access it from the inside.
Luckily I discovered Flex Seal liquid rubber. This was the best solution to complete the job and totally saved the day. The best part is that it's Non-hazardous, non-toxic, non-flammable, and UV-resistant.
It comes in many forms, but I went with the 16oz can of liquid rubber. You can find all the options here: Flex Seal
Lesson learned, ALWAYS test for leaks. Let it sit for 24 hours because even the smallest leak could become the biggest problem.
Other Tips
When buying the Pond Liner be sure to buy it extra large. You want to have enough to go up all the sides and tuck into the corners.
I purchased some PVC pipe caps to seal up the ends. You want them to be removable, but you don't want dirt, rocks, leaves, or bugs getting in there.
If you start your plants from seeds, you will need to water them from the top down to get them started. Sub-irrigated raised planters tend to have dryer topsoil than what you may be used to. But once the roots start growing down, the garden will start to maintain itself.
You do still need to water your garden... Maybe once a month. It depends on how dry your climate is. Denver Colorado is pretty dry, but we do get short bursts of rain in the afternoons often. You don't want to keep your sip raised bed full of water all the time. Soil and plants need to naturally go through periods of drought. When you have a lot of water, you will notice the plants grow rapidly. And as the water evaporates, the growth tends to slow down. But this is when the roots of the plants start to reach deeper into the soil. This makes for healthier plants and a more fruitful garden. If the bed stays too moist, it becomes a pond and can start to grow mold and all kinds of bad things for your plants like root rot.
For more details and diagrams on wicking beds, check out our Raised Bed Pinterest Board
Having a self watering raised bed garden has been the best way I've found for growing our own food. It was a lot of work but has really paid off. If you don't have space or the means to build your own like this, there are other wicking gardens available that produce great results. Here are a few wicking garden beds for sale.
Neater Nest is a participant in the Amazon Services LLC Associates Program, an affiliate advertising program designed to provide a means for sites to earn advertising fees by advertising and linking to amazon.com

This is a great site. Thanks for sharing!